
:)
슬라이딩 윈도우 기반 차선 인식 본문
슬라이딩 윈도우 기반의 차선인식 과정
- Image Read : 카메라 영상신호를 이미지로 읽기
- Warping : 원근변환으로 이미지 변형
- Gaussian Blur : 노이즈 제거
- Threshold : 이진 이미지로 변환
- Histogram : 히스토그램에서 차선 위치 추출
- Sliding Window : 슬라이딩 윈도우 좌우에 9개씩 쌓기
- Polyfit : 2차 함수 그래프로 차선 그리기
- 차선 영역 표시 : 원본 이미지에 차선 영역 오버레이
#!/usr/bin/env python
# -*- coding: utf-8 -*-

import numpy as np
import cv2, random, math, copy

Width = 640
Height = 480

cap = cv2.VideoCapture("xycar_track1.mp4")
window_title = 'camera'

warp_img_w = 320
warp_img_h = 240

warpx_margin = 20
warpy_margin = 3

nwindows = 9 # 슬라이딩 윈도우 개수
margin = 12  # 슬라이딩 윈도우 넓이
minpix = 5   # 선을 그리기 위해 최소한 있어야 할 점의 개수

lane_bin_th = 145

warp_src  = np.array([
    [230-warpx_margin, 300-warpy_margin],
    [45-warpx_margin,  450+warpy_margin],
    [445+warpx_margin, 300-warpy_margin],
    [610+warpx_margin, 450+warpy_margin]
], dtype=np.float32)

warp_dist = np.array([
    [0,0],
    [0,warp_img_h],
    [warp_img_w,0],
    [warp_img_w, warp_img_h]
], dtype=np.float32)

calibrated = True
if calibrated:

    # 자이카 카메라로 촬영한 동영상, Calibration 보정값을 사용
    mtx = np.array([
        [422.037858, 0.0, 245.895397],
        [0.0, 435.589734, 163.625535],
        [0.0, 0.0, 1.0]
    ])
    dist = np.array([-0.289296, 0.061035, 0.001786, 0.015238, 0.0])
    cal_mtx, cal_roi = cv2.getOptimalNewCameraMatrix(mtx, dist, (Width, Height), 1, (Width, Height))

def calibrate_image(frame):
    global Width, Height
    global mtx, dist
    global cal_mtx, cal_roi

    #보정 행렬값을 적용하여 이미지를 반듯하게 수정하는 함수
    tf_image = cv2.undistort(frame, mtx, dist, None, cal_mtx)
    x, y, w, h = cal_roi
    tf_image = tf_image[y:y+h, x:x+w]

    return cv2.resize(tf_image, (Width, Height))

# 변환전과 후의 4개 점 좌표를 전달해서 이미지를 원근변환 처리하여 새로운 이미지로 만든다
def warp_image(img, src, dst, size):
    M = cv2.getPerspectiveTransform(src, dst)
    Minv = cv2.getPerspectiveTransform(dst, src)
    warp_img = cv2.warpPerspective(img, M, size, flags=cv2.INTER_LINEAR)

    return warp_img, M, Minv

def warp_process_image(img):
    global nwindows
    global margin
    global minpix
    global lane_bin_th

    blur = cv2.GaussianBlur(img,(5, 5), 0) # 노이즈 제거

    # HLS 포맷에서 L채널을 이요하여 흰색선을 쉽게 구분
    _, L, _ = cv2.split(cv2.cvtColor(blur, cv2.COLOR_BGR2HLS))
    # L채널 이미지의 분할부를 확실하게 만들기 위해 바이너리
    _, lane = cv2.threshold(L, lane_bin_th, 255, cv2.THRESH_BINARY)

    histogram = np.sum(lane[lane.shape[0]//2:,:], axis=0)
    # x축을 반으로 나누어 왼쪽 차선과 오른쪽 차선을 구분
    midpoint = np.int(histogram.shape[0]/2)
    # 왼쪽 절반 구역에서 흰색 픽셀의 개수가 가장 많은 위치를 슬라이딩 윈도우의 왼쪽 시작 위치로 잡는다.
    leftx_current = np.argmax(histogram[:midpoint])
    # 오른쪽 절반 구역에서 흰색 픽셀의 개수가 가장 많은 위치를 슬라이딩 윈도우의 오른쪽 시작 위치로 잡는다.
    rightx_current = np.argmax(histogram[midpoint:]) + midpoint

    window_height = np.int(lane.shape[0]/nwindows) #240/9 = 26.XX
    nz = lane.nonzero()

    left_lane_inds = []
    right_lane_inds = []

    lx, ly, rx, ry = [], [], [], []

    out_img = np.dstack((lane, lane, lane))*255

    for window in range(nwindows):

        win_yl = lane.shape[0] - (window+1)*window_height
        win_yh = lane.shape[0] - window*window_height

        win_xll = leftx_current - margin  # 녹색사각형 크기 : 가로 24, 세로 26
        win_xlh = leftx_current + margin
        win_xrl = rightx_current - margin
        win_xrh = rightx_current + margin

        cv2.rectangle(out_img,(win_xll,win_yl),(win_xlh,win_yh),(0,255,0), 2)
        cv2.rectangle(out_img,(win_xrl,win_yl),(win_xrh,win_yh),(0,255,0), 2)

        # 슬라이딩 윈도우 박스(녹색박스) 하나 안에 있는 흰색 픽셀의 x좌표를 모두 모은다.
        good_left_inds = ((nz[0] >= win_yl)&(nz[0] < win_yh)&(nz[1] >= win_xll)&(nz[1] < win_xlh)).nonzero()[0]
        good_right_inds = ((nz[0] >= win_yl)&(nz[0] < win_yh)&(nz[1] >= win_xrl)&(nz[1] < win_xrh)).nonzero()[0]

        left_lane_inds.append(good_left_inds)
        right_lane_inds.append(good_right_inds)

        # 구한 x좌표 리스트에서 흰색점이 5개 이상인 경우에 한해 x 좌표의 평균값을 구함. -> 이 값을 슬라이딩 윈도우의 중심점으로 사용
        if len(good_left_inds) > minpix:
            leftx_current = np.int(np.mean(nz[1][good_left_inds]))
        if len(good_right_inds) > minpix:
            rightx_current = np.int(np.mean(nz[1][good_right_inds]))

        lx.append(leftx_current)
        ly.append((win_yl + win_yh)/2)

        rx.append(rightx_current)
        ry.append((win_yl + win_yh)/2)

    left_lane_inds = np.concatenate(left_lane_inds)
    right_lane_inds = np.concatenate(right_lane_inds)

    #left_fit = np.polyfit(nz[0][left_lane_inds], nz[1][left_lane_inds], 2)
    #right_fit = np.polyfit(nz[0][right_lane_inds] , nz[1][right_lane_inds], 2)

    # 슬라이딩 윈도우의 중심점(x좌표) 9개를 가지고 2차 함수를 만들어낸다.
    lfit = np.polyfit(np.array(ly),np.array(lx),2)
    rfit = np.polyfit(np.array(ry),np.array(rx),2)

    # 왼쪽과 오른쪽 각각 파란색과 빨간색으로 색상 변경
    out_img[nz[0][left_lane_inds], nz[1][left_lane_inds]] = [255, 0, 0]
    out_img[nz[0][right_lane_inds] , nz[1][right_lane_inds]] = [0, 0, 255]
    cv2.imshow("viewer", out_img)

    return lfit, rfit

def draw_lane(image, warp_img, Minv, left_fit, right_fit):
    global Width, Height
    yMax = warp_img.shape[0]
    ploty = np.linspace(0, yMax - 1, yMax)
    color_warp = np.zeros_like(warp_img).astype(np.uint8)

    left_fitx = left_fit[0]*ploty**2 + left_fit[1]*ploty + left_fit[2]
    right_fitx = right_fit[0]*ploty**2 + right_fit[1]*ploty + right_fit[2]

    # 이차함수 x = ay^2+by+c 이용해서 사다리꼴 이미지 외곽선 픽셀 좌표 계산
    pts_left = np.array([np.transpose(np.vstack([left_fitx, ploty]))])
    pts_right = np.array([np.flipud(np.transpose(np.vstack([right_fitx, ploty])))])
    pts = np.hstack((pts_left, pts_right))

    # 사다리꼴 이미지를 칼라로 그리고 거꾸로 원근변환해서 원본 이미지와 오버레이
    color_warp = cv2.fillPoly(color_warp, np.int_([pts]), (0, 255, 0))
    newwarp = cv2.warpPerspective(color_warp, Minv, (Width, Height))

    return cv2.addWeighted(image, 1, newwarp, 0.3, 0)

def start():
    global Width, Height, cap

    _, frame = cap.read()
    while not frame.size == (Width*Height*3):
        _, frame = cap.read()
        continue

    print("start")

    while cap.isOpened():

        _, frame = cap.read()

        image = calibrate_image(frame)
        warp_img, M, Minv = warp_image(image, warp_src, warp_dist, (warp_img_w, warp_img_h))
        left_fit, right_fit = warp_process_image(warp_img)
        lane_img = draw_lane(image, warp_img, Minv, left_fit, right_fit)

        cv2.imshow(window_title, lane_img)

        cv2.waitKey(1)

if __name__ == '__main__':
    start()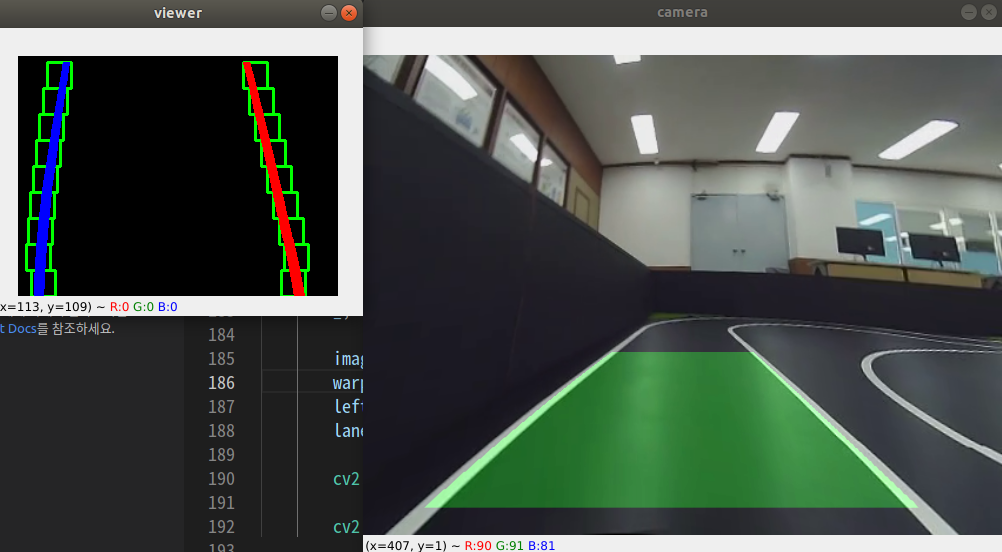
'ROS' 카테고리의 다른 글
| rosbag to image (0) | 2022.07.08 |
|---|---|
| 필터기반 조향각 제어 (0) | 2022.04.11 |
| 원근 변환과 슬라이딩 윈도우 (0) | 2022.04.10 |
| 와핑기법과 원근 변환 (0) | 2022.04.10 |
| 허프변환 기반 차선인식 (0) | 2022.04.10 |
'ROS' Related Articles
more


Comments